Thats not our table saw, but the safety tips will be as useful. So watch and remember!
Sunday, September 30, 2012
Saturday, September 29, 2012
FESTOOL DOMINO
This is a set of videos about the Festool Domino system. Have also a look at the other parts of the videos.
TOOL SAFETY - KAPEX
Beeing short before the first building week, we would like to draw your attention towards a couple of videos for safety instructions and the general use of some of our tools. This time the Festool Kapex.
Friday, September 28, 2012
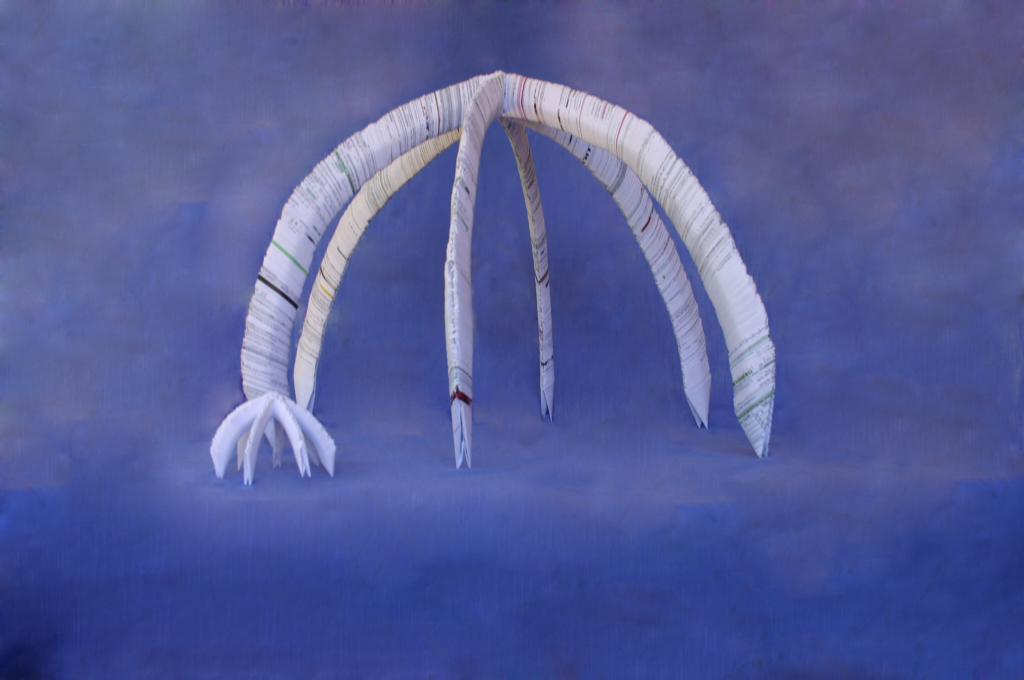
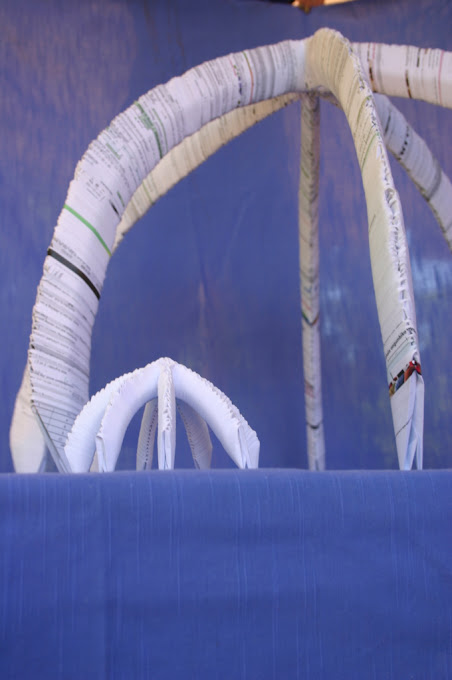
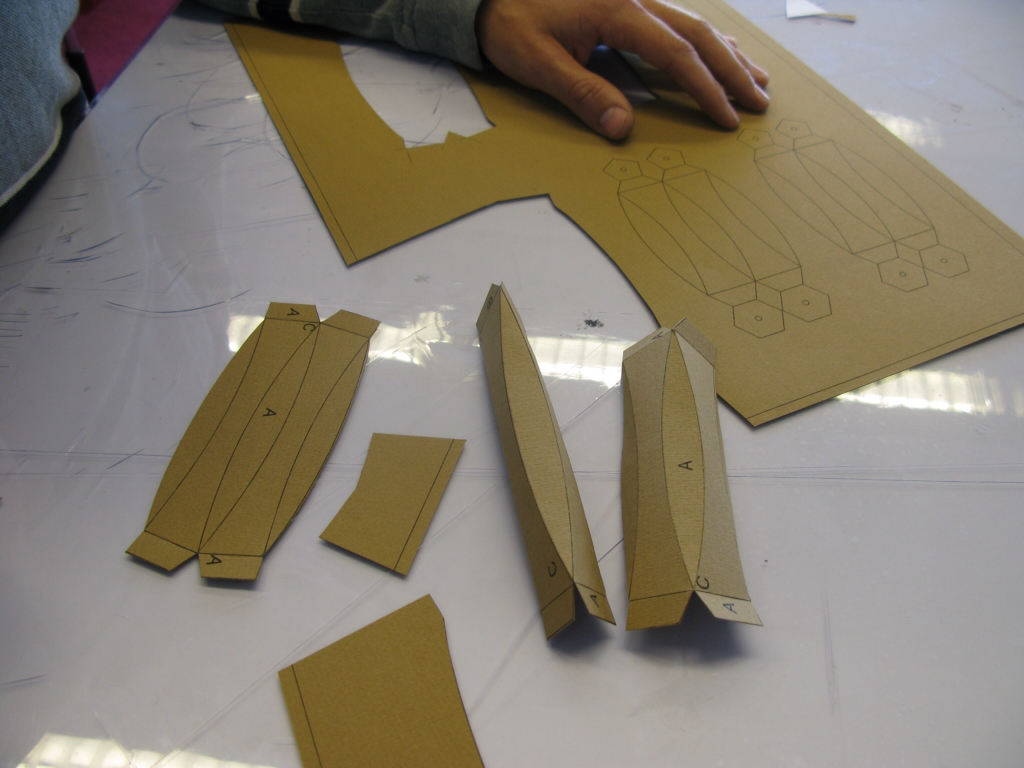
FOLDED PAPER CONSTRUCTIONS
Mel Schafer was busy the last weeks folding lots of small paper pieces. If you slide them into each other you are able to create these wonderful structures. We dont have a clue right now if we are able to upscale this concepts, but we have to say it looks wonderful.
Thanks Mel also for the pictures.


Thanks Mel also for the pictures.


Wednesday, September 26, 2012
NEW ITEMS IN THE SHOP

We added two new items in our shop!
If you are fighting against spaghetti bolognese of paint and grease thats the perfect choice to protect yourself with style: our new Bucky Lab apron and a nice bag to bring it to the shop ...which also offers plenty of room for other things you are carrying around.
And as usual we havent added any fees, so thats just the price the shop is asking for !
Have a look in our shop, the button is found in the right top of the website.
or here.
Heel Nederland een Bucky Lab? | Booosting.nl
A nice article about the bucky lab we found in the internet...
Heel Nederland een Bucky Lab? | Booosting.nl
Heel Nederland een Bucky Lab? | Booosting.nl
HOW IT WORKS: WIND TURBINE
by Cedrique Steenkamer
 In general
On more and more places you can found a park wind turbines. Often you see them along the highways, in the sea or in an open landscapes. Using the natural energy and thus saving fossil fuel is an important theme. A windturbine uses the power of the wind for generating electricity. A windturbine has three blades, the rotating movement sets a generator in motion and it will generate electric energy. He is effective at a wind speed of 3 meters per second. Its maximum rotation is 25 meters per second because of the safety. The beginning of the report is about the wind turbines in general, different types and construction. The last part is more zoomed in on the blades.
Types
There are two types of wind turbines. The difference is the direction of the rotation-axis. The vertical-axis turbine isn’t dependent on the wind direction. He is very suitable for a built environment. In the Netherlands most turbines have a horizontal-axis turbine.
Structure
The structure of a wind turbine is roughly divided into two parts; a tower and the gondola. The tower is about 100 meters and the gondola 40 meters. At the front of the gondola three turbine blades are placed with a diameter of 80 meters. The blades are fixed on an axis that runs in the gondola. In the gondola the gearbox, generator and transformer are placed. The gondola is connected with the tower and is able to rotate, so that the nose of the gondola is always point in the wind direction. At the bottom of the tower there is a computer that controls all wind directions and speeds. The current is led through a cable to the power station.
 Gondola
As mentioned the gondola includes the components in order to concert the rotation to electricity. Where the blades are fixed on the gondola, there are three big circular openings. In these openings fit the blades. The blades has a blunt at the end and the blunts are fixed on the horizontal axis. The rotating movement of the axis is accelerated in the gearbox. The gearbox drives the generator then. A generator is like a dynamo. In a dynamo, the rotary motion will be convert into electricity. In the tower, there is a transformer which increases the current voltage further.

Turbine blades
The cross section of a blade has a teardrop shape. The shape grows as it nears the top of the gondola. The turbine blades are inspired by the wings of an airplane. If the blades are hold horizontally, then there is under pressure, suction, on the top. This wing is pushed upward, lifting. When the wing is rotated to a certain angle, the lifting is stopped and there is a break. The air flow is blocked.

The three blades have an equal weight. A blade of 27 meters weights 2.4 tonnes. A blade of 49 meters weights 10 tons. Most rotor blades for large wind turbines are made of fiberglass reinforced plastics (GPR) glass fiber reinforced polyester or epoxy. Glass fiber mats, light woods and resins are the basis for a wind turbine blade. Layer by layer the fiberglass are placed on each other, and mixed with resin to a virtually indestructible composite material. Here and there comes a layer of wood between. With the exception of the screws, to fix the blade on the turbine, is the only metal part is a lightning conductor. Which is incorporated on the end of the blade. The lifetime of a blade is approximately 15-20 years.

Controllability blades
The connection between the blade and the front of the gondola is a circle in an opening in the stump. In the stump are gear wheels which ensure that the blades can be rotated. This controllability is called pitch. This system is taken from the airplane technology. A supervised machine measures the number of rotations per second. The controller performs the pitch when it is necessary. This control is very imprtant. The turbine is very light weight and has a large diameter. There are large velocities involved. the outer edge of a sheet can reach a speed of 64 m/s.

On more and more places you can found a park wind turbines. Often you see them along the highways, in the sea or in an open landscapes. Using the natural energy and thus saving fossil fuel is an important theme. A windturbine uses the power of the wind for generating electricity. A windturbine has three blades, the rotating movement sets a generator in motion and it will generate electric energy. He is effective at a wind speed of 3 meters per second. Its maximum rotation is 25 meters per second because of the safety. The beginning of the report is about the wind turbines in general, different types and construction. The last part is more zoomed in on the blades.
Types
There are two types of wind turbines. The difference is the direction of the rotation-axis. The vertical-axis turbine isn’t dependent on the wind direction. He is very suitable for a built environment. In the Netherlands most turbines have a horizontal-axis turbine.
Structure
The structure of a wind turbine is roughly divided into two parts; a tower and the gondola. The tower is about 100 meters and the gondola 40 meters. At the front of the gondola three turbine blades are placed with a diameter of 80 meters. The blades are fixed on an axis that runs in the gondola. In the gondola the gearbox, generator and transformer are placed. The gondola is connected with the tower and is able to rotate, so that the nose of the gondola is always point in the wind direction. At the bottom of the tower there is a computer that controls all wind directions and speeds. The current is led through a cable to the power station.

As mentioned the gondola includes the components in order to concert the rotation to electricity. Where the blades are fixed on the gondola, there are three big circular openings. In these openings fit the blades. The blades has a blunt at the end and the blunts are fixed on the horizontal axis. The rotating movement of the axis is accelerated in the gearbox. The gearbox drives the generator then. A generator is like a dynamo. In a dynamo, the rotary motion will be convert into electricity. In the tower, there is a transformer which increases the current voltage further.

Turbine blades
The cross section of a blade has a teardrop shape. The shape grows as it nears the top of the gondola. The turbine blades are inspired by the wings of an airplane. If the blades are hold horizontally, then there is under pressure, suction, on the top. This wing is pushed upward, lifting. When the wing is rotated to a certain angle, the lifting is stopped and there is a break. The air flow is blocked.

The three blades have an equal weight. A blade of 27 meters weights 2.4 tonnes. A blade of 49 meters weights 10 tons. Most rotor blades for large wind turbines are made of fiberglass reinforced plastics (GPR) glass fiber reinforced polyester or epoxy. Glass fiber mats, light woods and resins are the basis for a wind turbine blade. Layer by layer the fiberglass are placed on each other, and mixed with resin to a virtually indestructible composite material. Here and there comes a layer of wood between. With the exception of the screws, to fix the blade on the turbine, is the only metal part is a lightning conductor. Which is incorporated on the end of the blade. The lifetime of a blade is approximately 15-20 years.

Controllability blades
The connection between the blade and the front of the gondola is a circle in an opening in the stump. In the stump are gear wheels which ensure that the blades can be rotated. This controllability is called pitch. This system is taken from the airplane technology. A supervised machine measures the number of rotations per second. The controller performs the pitch when it is necessary. This control is very imprtant. The turbine is very light weight and has a large diameter. There are large velocities involved. the outer edge of a sheet can reach a speed of 64 m/s.
Monday, September 24, 2012
FIRST CONCEPTS PREVIEW
The students are very busy to develop this semesters new innovations, we dont want to tell too much right now but here are some first impressions without comments.


CARMEN OPERA STAGE
This semester we will support the Carmen Opera team that is organized for the 170 years anniversary of th TU Delft. The team of the bucky lab will help to build the bullfight arena that will convert the Aula of the TU Delft into the stage for the opera.
We will post more infos in the future and also some backstage infos of our building week in October.
The building of the stage will be the introduction of production technologies for the students and the first opportunity to get their hands on the tools, learn how to work with it and get a proper safety instructions.
We are looking forward the building week.
more info also on facebook: https://www.facebook.com/carmendelft
Friday, September 21, 2012
SHAPING SPRING STEEL
All of our bucky lab students are busy developing their innovative concepts, Tim Jonathan used a nice trick to make his own spring according to his needs. Thanks for the nice illustrative video.
Tuesday, September 18, 2012
HYPER MATRIX
an amazing installation, if you already liked the Hyposurface you will also like this one...
Friday, September 14, 2012
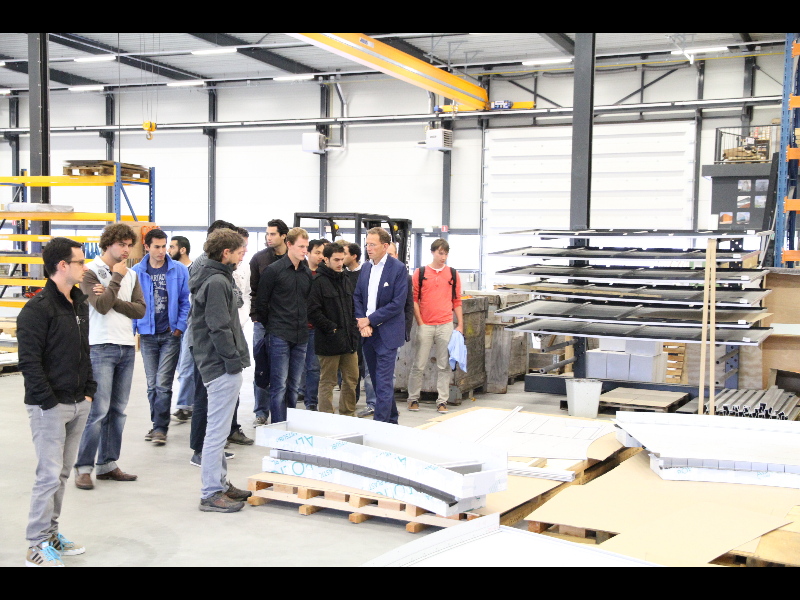
BOUT EXCURSION SORBA


Thursday, September 13, 2012
Wednesday, September 12, 2012
HOW IT WORKS: GLIDERS
by Aman Habtemariam
Introduction
A glider is a special kind of aircraft that has no engine. There are many different types of gliders. The
simplest gliders are paper, balsa wood or Styrofoam toy gliders. These gliders use the basics of aerodynamics.
Another form of glider is hang-glider, which is made with cloth wings and minimal structure,
like a piloted kite.
However this report is about sailplane gliders, with standard aircraft parts, construction and fl ight control
systems, but no engine. The wright brothers invented this kind of gliders in the year 1900 to 1903.
It is a combination of structural parts and units, which is independent with each other. The arrangement
of separate parts and units which make up the entire glider are subject to certain laws of construction.
The shape of the glider and its structural solutions are found on the basic requirements of
aerodynamics, strength, production and operation. Therefore the report shows what gliders are; how
glider functions and their technical description.
-2.jpg)
What are the components of glider? and what are their functions?
Gliders are designed with a smooth skin to allow the plane to slip more easily through the air. They are
constructed from aluminium with structural aluminium skins. The rivets and seams are not used, because it
produces additional drag, which tends to decrease performance. Therefore fi berglass and carbon fibre are
quickly replacing aluminium.
-3.jpg)
Glider can be divided into three main parts:
1. Fuselage (body): Gliders has no engine taking up space, they are sized around the cockpit, which carries
two people. This is considered to be the main body of a glider. It is cambered and we attach the wing in
the middle section, where the camber is maximum.
2. Wing: It is the most essential part of a plane. When air fl ows, due to the curvature of its upper and lower
parts lift is generated, which is responsible for balancing the weight of the plane, and the body can thus fl y.
The wings of a glider are longer and narrower than those on conventional aircraft. The slenderness ratio of
the wings is: (span of the wing) 2 / area of the wing.
The wings have very high aspect ratio, so their span is very long compared to the width, because the drag
created during the lift can have a signifi cant portion of the drag on a glider. And the only way to solve it is to
increase the slenderness ratio. Therefore they produce less drag for the amount of lift they produce.
The airfoil of a wing, which is a cross sectional shape of the wing consist of leading edge - front edge; trailing
edge - back edge; chord line - line connecting these two edges; camber line - a joining line of the two
edges of an airfoil equidistant from the upper and lower surfaces. The centre of pressure, which is the point
in airfoil where the lift is concentrated upon is located at C/4, where C is the chord length. It must coincide
with the centre of gravity, which is the point where the weight of the glider acts. To do that, we must add
some weight at the nose.
-4.jpg)
3. Control surfaces: Gliders use the same control surfaces as other conventional planes to control the direction of flight. The ailerons and elevator are controlled using a single control stick between the pilot’s legs.The rudder, as in conventional aircraft, is controlled using foot pedals.
The control surface consists of:
Ailerons: Controls the Rolling motion of the glider. It is placed on opposite directions on each side of the
glider. If the pilots want to roll the plane to the right he will use his control stick to the right. This causes the
left aileron to defl ect down, creating more lift on this side and the right aileron to defl ect up, creating less lift
on this side. This causes the glider to rotate about its long axis.
Elevator (horizontal stabilizer): It is a movable horizontal wing structure on the tail and it controls the pitch of
the glider, by pointing the nose of the glider up or down.
Rudder (vertical stabilizer): It is a movable vertical wing structure on the tail and it controls the yaw of the
glider, by pointing the nose of the glider from left to right or visa versa.
To understand the more about the movements look at the orientation of the glider.
4. Landing gear: By reducing the size of the gear, the size of a glider could be reduced. It consists of a single
wheel mounted just below the cockpit.
5. Cockpit: It consists of:
A. Altimeter- indicates altitude;
B. Air-speed indicator- tells how fast you’re going;
C. Variometer- tells what the air around you;
D. Radio- communication with other planes or ground;
E. Control stick- controls the control surfaces
F. Tow rope release knob- disengage the tow rope
-5.jpg) What are the orientations of a glider?
What are the orientations of a glider?
Any aircraft, including gliders will rotate about its centre of gravity, a point which is the average location
of the mass of the glider. To defi ne the orientation of the glider, we must fi rst defi ne the three dimensional
coordinate system through the centre of gravity with each axis perpendicular to the other two axes, by the
amount of rotation of the parts of the glider along these principal axes.
Yaw axis: It is perpendicular to the wings with its origin at the centre of the gravity and directed towards
the bottom of the aircraft. Yaw motion is a movement of the nose of the aircraft from side to side. Rudder is
used to make this motion possible.
Pitch axis: It is perpendicular to the yaw axis and is parallel to the wings with its origin at the centre of the
gravity and directed towards the right wing. Pitch motion is an up or down movement of the nose of the
glider. Elevators are used to make this motion possible.
Roll axis: It is perpendicular to the other two axes with its origin at the centre of gravity, and is directed
towards the nose of the glider. So the rolling motion is an up or down movement of the wing tips. Aileon are
used to make this motion possible.
Aerodynamic forces
There are four aerodynamic forces acting on a glider in fl ight and these are:
1. lift: upward force generated by wings
2. Gravity: downward force, which is the weight of the glider
3. Drag: backward force, which is the resistance of air
4. Thrust: forward motion
-6.jpg)
How does a glider stays in the air without an engine?
For the lift, wing of a glider plays an important role; it must produce enough lift to balance the weight of the
glider. The faster the glider goes the more lift the wings make and eventually it will produce enough lift to
keep it in the air. But the wings and the fuselage produce drag, and they produce more drag the faster it
fl ies. The glider has to generate speed by angling it downward and trade altitude for speed, because it does
not have engine to produce thrust. By doing this it will fl y fast enough to generate the lift needed toe support
its weight.
The performance of the glider is measured by glide ratio, which could reach to 60:1. The glide ratio tells
us how much horizontal distance a glider can travel compared to the altitude it has to drop. If you compare
it with a commercial jetliner, its glide ratio is somewhere around 17:1. But glide ratio is not the only factor
involved in making the glider stay in the air. So how do they do it?
A glider is dependent on nature, it will slowly descend with respect to the air around it, but what if the air
around it is moving upward faster than the glider was descending? For example if a glider descends at 1
m/s and air around the glider is rising at 2 m/s, the glider is gaining altitude.
There are three main types of rising air used by glider pilots increase their fl ight times:
1. Thermals: As the sun heats the air on the ground it will expand and rises. Therefore parking lots, dark
ploughed fi elds and rocky terrain, are a great way to fi nd thermal columns. Pilots look also for newly forming
clouds or large birds soaring without flapping their wings, which can also be signs of thermal activity. So
glider will follow the thermal direction until they reach their desired altitude.
2. Ridge lift: It is created by wind blowing against mountains, hills or other ridges. As the air reaches the
mountain, it will redirect upward and form a band of lift along the windward side of the slope.
3. Wave lifts: It is similar to ridge lift and it is created on the leeward side of the peak by winds passing over
the mountain instead of up one side and with the help of this lift gliders could reach an altitude of more than
10.700 meters.
-7.jpg) What is airfoil? How is it designed?
What is airfoil? How is it designed?
Airfoil is surface on a glider that produces lift. Even though there is different kind of airfoils, all produce lift
in a same way. This is the main section of glider and fundamental principles of aerodynamics are used to
design the airfoil.
While in flight three kind of forces are applied- lift, drag, weight and thrust:
Lift opposes the downward force of weight and is produced by the dynamic effects of airstream acting on
the wing. Lift is produced when there is decreased pressure above and increased pressure below an airfoil.
Drag is the force that resists the movement of the glider through the air. There are two kind of drag: parasite
drag- aircraft surface is interfered, which causes with the smooth airfl ow around the glider to slow down;
Form drag- turbulent wake causes separation of airfl ow form the surface of a structure. A great streamlined
airfoil designs reduces form drag by reducing the amount of airfl ow separation.
Weight is the third force that acts on a glider. Weight affects the vertical lift through the centre of gravity of
the glider. Gravitational force will act to move the glider through the air since a portion of the weight vector
of a glider is directed forward.
Thrust is the forward force and in the case of unpowered gliders have an outside force, such as a tow
plane, winch or automobile to launch the glider.
Therefore the airfoil is design using the fundamental understanding of the aerodynamic forces. The airfoil is
streamlined and the end are rounded as far as possible in order to reduce drag, the weight of the model is
kept as minimum. When the drag is more than the lift, then the glider will loss lift and will result into a stall,
where the weight of the glider cannot be supported any longer.
Introduction
A glider is a special kind of aircraft that has no engine. There are many different types of gliders. The
simplest gliders are paper, balsa wood or Styrofoam toy gliders. These gliders use the basics of aerodynamics.
Another form of glider is hang-glider, which is made with cloth wings and minimal structure,
like a piloted kite.
However this report is about sailplane gliders, with standard aircraft parts, construction and fl ight control
systems, but no engine. The wright brothers invented this kind of gliders in the year 1900 to 1903.
It is a combination of structural parts and units, which is independent with each other. The arrangement
of separate parts and units which make up the entire glider are subject to certain laws of construction.
The shape of the glider and its structural solutions are found on the basic requirements of
aerodynamics, strength, production and operation. Therefore the report shows what gliders are; how
glider functions and their technical description.
-2.jpg)
What are the components of glider? and what are their functions?
Gliders are designed with a smooth skin to allow the plane to slip more easily through the air. They are
constructed from aluminium with structural aluminium skins. The rivets and seams are not used, because it
produces additional drag, which tends to decrease performance. Therefore fi berglass and carbon fibre are
quickly replacing aluminium.
-3.jpg)
Glider can be divided into three main parts:
1. Fuselage (body): Gliders has no engine taking up space, they are sized around the cockpit, which carries
two people. This is considered to be the main body of a glider. It is cambered and we attach the wing in
the middle section, where the camber is maximum.
2. Wing: It is the most essential part of a plane. When air fl ows, due to the curvature of its upper and lower
parts lift is generated, which is responsible for balancing the weight of the plane, and the body can thus fl y.
The wings of a glider are longer and narrower than those on conventional aircraft. The slenderness ratio of
the wings is: (span of the wing) 2 / area of the wing.
The wings have very high aspect ratio, so their span is very long compared to the width, because the drag
created during the lift can have a signifi cant portion of the drag on a glider. And the only way to solve it is to
increase the slenderness ratio. Therefore they produce less drag for the amount of lift they produce.
The airfoil of a wing, which is a cross sectional shape of the wing consist of leading edge - front edge; trailing
edge - back edge; chord line - line connecting these two edges; camber line - a joining line of the two
edges of an airfoil equidistant from the upper and lower surfaces. The centre of pressure, which is the point
in airfoil where the lift is concentrated upon is located at C/4, where C is the chord length. It must coincide
with the centre of gravity, which is the point where the weight of the glider acts. To do that, we must add
some weight at the nose.
-4.jpg)
3. Control surfaces: Gliders use the same control surfaces as other conventional planes to control the direction of flight. The ailerons and elevator are controlled using a single control stick between the pilot’s legs.The rudder, as in conventional aircraft, is controlled using foot pedals.
The control surface consists of:
Ailerons: Controls the Rolling motion of the glider. It is placed on opposite directions on each side of the
glider. If the pilots want to roll the plane to the right he will use his control stick to the right. This causes the
left aileron to defl ect down, creating more lift on this side and the right aileron to defl ect up, creating less lift
on this side. This causes the glider to rotate about its long axis.
Elevator (horizontal stabilizer): It is a movable horizontal wing structure on the tail and it controls the pitch of
the glider, by pointing the nose of the glider up or down.
Rudder (vertical stabilizer): It is a movable vertical wing structure on the tail and it controls the yaw of the
glider, by pointing the nose of the glider from left to right or visa versa.
To understand the more about the movements look at the orientation of the glider.
4. Landing gear: By reducing the size of the gear, the size of a glider could be reduced. It consists of a single
wheel mounted just below the cockpit.
5. Cockpit: It consists of:
A. Altimeter- indicates altitude;
B. Air-speed indicator- tells how fast you’re going;
C. Variometer- tells what the air around you;
D. Radio- communication with other planes or ground;
E. Control stick- controls the control surfaces
F. Tow rope release knob- disengage the tow rope
-5.jpg)
Any aircraft, including gliders will rotate about its centre of gravity, a point which is the average location
of the mass of the glider. To defi ne the orientation of the glider, we must fi rst defi ne the three dimensional
coordinate system through the centre of gravity with each axis perpendicular to the other two axes, by the
amount of rotation of the parts of the glider along these principal axes.
Yaw axis: It is perpendicular to the wings with its origin at the centre of the gravity and directed towards
the bottom of the aircraft. Yaw motion is a movement of the nose of the aircraft from side to side. Rudder is
used to make this motion possible.
Pitch axis: It is perpendicular to the yaw axis and is parallel to the wings with its origin at the centre of the
gravity and directed towards the right wing. Pitch motion is an up or down movement of the nose of the
glider. Elevators are used to make this motion possible.
Roll axis: It is perpendicular to the other two axes with its origin at the centre of gravity, and is directed
towards the nose of the glider. So the rolling motion is an up or down movement of the wing tips. Aileon are
used to make this motion possible.
Aerodynamic forces
There are four aerodynamic forces acting on a glider in fl ight and these are:
1. lift: upward force generated by wings
2. Gravity: downward force, which is the weight of the glider
3. Drag: backward force, which is the resistance of air
4. Thrust: forward motion
-6.jpg)
How does a glider stays in the air without an engine?
For the lift, wing of a glider plays an important role; it must produce enough lift to balance the weight of the
glider. The faster the glider goes the more lift the wings make and eventually it will produce enough lift to
keep it in the air. But the wings and the fuselage produce drag, and they produce more drag the faster it
fl ies. The glider has to generate speed by angling it downward and trade altitude for speed, because it does
not have engine to produce thrust. By doing this it will fl y fast enough to generate the lift needed toe support
its weight.
The performance of the glider is measured by glide ratio, which could reach to 60:1. The glide ratio tells
us how much horizontal distance a glider can travel compared to the altitude it has to drop. If you compare
it with a commercial jetliner, its glide ratio is somewhere around 17:1. But glide ratio is not the only factor
involved in making the glider stay in the air. So how do they do it?
A glider is dependent on nature, it will slowly descend with respect to the air around it, but what if the air
around it is moving upward faster than the glider was descending? For example if a glider descends at 1
m/s and air around the glider is rising at 2 m/s, the glider is gaining altitude.
There are three main types of rising air used by glider pilots increase their fl ight times:
1. Thermals: As the sun heats the air on the ground it will expand and rises. Therefore parking lots, dark
ploughed fi elds and rocky terrain, are a great way to fi nd thermal columns. Pilots look also for newly forming
clouds or large birds soaring without flapping their wings, which can also be signs of thermal activity. So
glider will follow the thermal direction until they reach their desired altitude.
2. Ridge lift: It is created by wind blowing against mountains, hills or other ridges. As the air reaches the
mountain, it will redirect upward and form a band of lift along the windward side of the slope.
3. Wave lifts: It is similar to ridge lift and it is created on the leeward side of the peak by winds passing over
the mountain instead of up one side and with the help of this lift gliders could reach an altitude of more than
10.700 meters.
-7.jpg)
Airfoil is surface on a glider that produces lift. Even though there is different kind of airfoils, all produce lift
in a same way. This is the main section of glider and fundamental principles of aerodynamics are used to
design the airfoil.
While in flight three kind of forces are applied- lift, drag, weight and thrust:
Lift opposes the downward force of weight and is produced by the dynamic effects of airstream acting on
the wing. Lift is produced when there is decreased pressure above and increased pressure below an airfoil.
Drag is the force that resists the movement of the glider through the air. There are two kind of drag: parasite
drag- aircraft surface is interfered, which causes with the smooth airfl ow around the glider to slow down;
Form drag- turbulent wake causes separation of airfl ow form the surface of a structure. A great streamlined
airfoil designs reduces form drag by reducing the amount of airfl ow separation.
Weight is the third force that acts on a glider. Weight affects the vertical lift through the centre of gravity of
the glider. Gravitational force will act to move the glider through the air since a portion of the weight vector
of a glider is directed forward.
Thrust is the forward force and in the case of unpowered gliders have an outside force, such as a tow
plane, winch or automobile to launch the glider.
Therefore the airfoil is design using the fundamental understanding of the aerodynamic forces. The airfoil is
streamlined and the end are rounded as far as possible in order to reduce drag, the weight of the model is
kept as minimum. When the drag is more than the lift, then the glider will loss lift and will result into a stall,
where the weight of the glider cannot be supported any longer.
Friday, September 7, 2012
ROMAZO MINI SYMPOSIUM
Today we had for the very first time a start up mini symposium within the bucky lab.Our cooperation partner ROMAZO the sectorgroup organisation for the dutch sun shading manufaturers and suppliers invited the whole bucky lab semester to Nieuwegein to held a sunshading mini symposium.
Getting first hand information about the different topics of sun shading was a very good start to think about innovative ideas within the semester for the students.

After a short travel with the bus, the students arrived at the ROMAZO headquater in Nieuwegein in the Metalunie building.

A second breakfast with coffee and tea was a welcome surprize to get the first discussions about the first concepts.

Martin Straver, head of ROMAZO gave an introduction about the organisation and lead through the program of the day.


Prof. Dr. Hermans from the University of Leiden explained the physical background of light and thermal dynamics, he was also able to show some experiments and explained the influences of IR light.

The members of Romazo already prepared a small exhibition around the lecture room and showed their products.

always nice...thanks for the warm welcome !

coffee break with some first discussions about the lectures.

Wouter Beck from Hunter Douglas explained external sunshades.

Do we see the first concept sketches..?

Evert Bos from Verosol explained internal solar shadings and showed the tricks how to shade also from the inside.

perfect sunny weather and a lunch break outside.

Klaas Jan Postma from Swela explained solar shading fabrics, quite impressive in how many ways your are able to treat a piece of fabric.

Henk Altena from Verano showed some project samples including the Renzo Piano Highrise "the Shard" in London.

Marcel Bilow, Dr. Bucky Lab showed some bucky lab projects and ended the session ( as usual behing the camera ...some say he is camera shy ...)

A huge variety of ROMAZO members brought product samples and the students had the chance to ask the experts during the mini sunshade fair.


Martin Straver had a surprize at the end of the day for the bucky lab. Having a mobile workshop and talking about sun shading all day long he mentioned that we also need a little mobile sun shade ! He handed over a foldable evotent with the Romazo and bucky lab logo as a perfect start for the cooperation for the next years. What a lovely gift and a perfect addition to our mobile workshop. Thank you very much !
It was a perfect day, the weather already showed how nessesary a sun shade is and the students dived into the topic very fast, this will for sure not the last time we have a mini symposium like that.
Thanks to ROMAZO and his members for their hospitality and the great day!
Getting first hand information about the different topics of sun shading was a very good start to think about innovative ideas within the semester for the students.

After a short travel with the bus, the students arrived at the ROMAZO headquater in Nieuwegein in the Metalunie building.

A second breakfast with coffee and tea was a welcome surprize to get the first discussions about the first concepts.

Martin Straver, head of ROMAZO gave an introduction about the organisation and lead through the program of the day.


Prof. Dr. Hermans from the University of Leiden explained the physical background of light and thermal dynamics, he was also able to show some experiments and explained the influences of IR light.

The members of Romazo already prepared a small exhibition around the lecture room and showed their products.

always nice...thanks for the warm welcome !

coffee break with some first discussions about the lectures.

Wouter Beck from Hunter Douglas explained external sunshades.

Do we see the first concept sketches..?

Evert Bos from Verosol explained internal solar shadings and showed the tricks how to shade also from the inside.

perfect sunny weather and a lunch break outside.

Klaas Jan Postma from Swela explained solar shading fabrics, quite impressive in how many ways your are able to treat a piece of fabric.

Henk Altena from Verano showed some project samples including the Renzo Piano Highrise "the Shard" in London.

Marcel Bilow, Dr. Bucky Lab showed some bucky lab projects and ended the session ( as usual behing the camera ...some say he is camera shy ...)

A huge variety of ROMAZO members brought product samples and the students had the chance to ask the experts during the mini sunshade fair.


all members were quite impressed by the smart questions and interest of the students and had also some intersting internal discussions.

Martin Straver had a surprize at the end of the day for the bucky lab. Having a mobile workshop and talking about sun shading all day long he mentioned that we also need a little mobile sun shade ! He handed over a foldable evotent with the Romazo and bucky lab logo as a perfect start for the cooperation for the next years. What a lovely gift and a perfect addition to our mobile workshop. Thank you very much !
It was a perfect day, the weather already showed how nessesary a sun shade is and the students dived into the topic very fast, this will for sure not the last time we have a mini symposium like that.
Thanks to ROMAZO and his members for their hospitality and the great day!
Subscribe to:
Posts (Atom)